
BIKER BUTT PACK. - HOW TO BUILD YOUR OWN.
 |
HOW TO BUILD YOUR OWN BIKER BUTT PACK.
You might be interested to find out that back in September (2019) I started riding for a well know food delivery company. I’m really enjoying it, it fits in with blogging duties and makes some extra money which is super helpful at the moment.
So I’m issued with this terrible food deliver backpack that has some extra pockets that I thought would work for personal carry; food, wallet, keys, bike pump and tools etc but I noticed during my first ride the backpack had to come on and off a lot and could be at risk, during busy hack-n-slash sessions of being stollen by drunk scallywags in hope of free chicken and chips, anyway it occurred to me that it was not tactical to use this backpack to carry anything personal or valuable given it looked like it was going to be very possible to separate it, from me, so drawing on the military / SF for inspiration once again I devised the belt order! Important and essential equipment carried on the belt that stays with the person when the rucksack / Bergen is taken off.
So I’m issued with this terrible food deliver backpack that has some extra pockets that I thought would work for personal carry; food, wallet, keys, bike pump and tools etc but I noticed during my first ride the backpack had to come on and off a lot and could be at risk, during busy hack-n-slash sessions of being stollen by drunk scallywags in hope of free chicken and chips, anyway it occurred to me that it was not tactical to use this backpack to carry anything personal or valuable given it looked like it was going to be very possible to separate it, from me, so drawing on the military / SF for inspiration once again I devised the belt order! Important and essential equipment carried on the belt that stays with the person when the rucksack / Bergen is taken off.
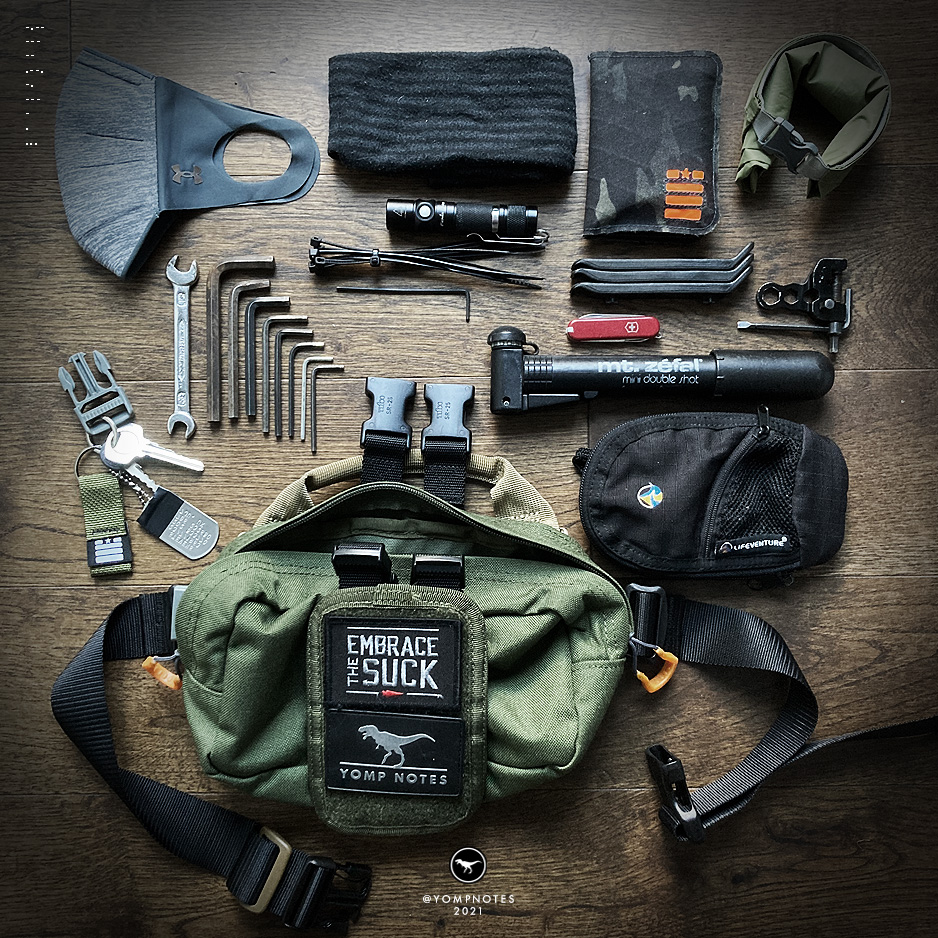 |
| YOU WANNA SEE WHAT I CARRY? YOU GOT IT. |
If you’re paying attention you’d know from the post a couple months ago that I have a VANQUEST DENTRITE Waist Pack, so why aren’t I you using that? Simple! I could see the possibility of putting my own Waist Pack together using pouches buckles and straps I had around me, I wanted to see that real so did it! Now I’ve been using it for riding work everyday for a month or so and now I pretty attached... I like it : )
IF YOU WANT TO MAKE ONE, WHAT DO YOU NEED?
I’m going to assume that you lead a busy, useful and productive life, you don’t have time to consider this and if you did want a Waist Pack like it, you could just buy one and get on with your life. OK but this isn’t meant to be a HOW-To post, hopefully it’s more of an example of solving problems you think you might have by looking around you. Today? Yes it’s configing a Waist Pack from an old utility pouch but tomorrow it might be fixing a broken rucksack with some spare straps so you can get home safely Really that’s what YOMP NOTES is all about! Recognising possibilities in the standard to create something new or improve and fix the old.
IF YOU WANT TO MAKE ONE, WHAT DO YOU NEED? If you’re still here? Let’s go:
 |
PART LIST:
1 - One large, horizontal utility pouch.
This ones made by FLYYE INDUSTRIES, it’s a basic, single compartment pouch but it does have wide elastic retains inside for 2 large and 4 small. It has tough YKK zipper that opens nice and wide. To the back of the pouch is a MOLLE system, this is going to be important later.
2 - You’re going to need a 1.5” Waist Belt, the kind you might have on a small rucksack and can buy as a component item easily on AMAZON.
3 - Two GrimLoc buckles to attach the waist belt to the utility pouch
3 - Two Utility Straps with quick release, adjustable buckles. You might consider these optional but I think they’re key for compression of the pouch and for strapping a waterproof jacket for instance.
4 - Carry handle. This is optional, I’ve included this one, taken from a 511 COVRT INSERT (MOLLE) PANEL because I had it to hand. It is really useful but I don’t know where to buy a carry handle like this.
5 - Four Siamese Slick Clips for securing the compression straps
6 - Two Web Dominators to tidy up compression strap loose ends.
 |
THE BUILD METHOD
 |
 |
1 - First attach the waist belt to the pouch using the GrimLocs. This is the most important thing to do, cos once it’s done, you’re ready the to go, you can add the rest later.
 |
 |
2 - Add the compression straps. They are basically wrapped around the pouch, threaded through the MOLLE and secured in place with Siamese Slick Clips. You could also use Ranger bands, buckles or even zip ties, anything to guarantee you’re not going to lose those straps as they work to compress lose and rattly items in your pouch and most usefully can be used to cinch up layers and jackets when they’re too warm to wear.
 |
3 - Add a grab handle. Since putting the butt pack together I’ve found the grab handle useful, I would recommend that you add one if you can. If you don’t have one lying around like I did, you could make one from 550 Paracord, using the old faithful, Cobra weave. Or you could use some split rings and some 1” strap or maybe an old MOLLE strap.
OPTIONAL
 |
I’ve swapped out the original pouch Paracord zipper pulls for VANQUEST Spartan zipper pulls in blaze orange making them easer to spot in low light.
 |
Secondly I’ve made an auxiliary hook and loop MOLLE panel from part of an unused CONDOR Tear Away IFAC pouch. The compression straps are threaded through the MOLLE on the back of the panel giving me some needed space for moral patches. You could add a small pouch in the same way! (very cool).
 |
As it stands the Biker Butt Pack doesn’t have any internal organisation, this works for me at the moment, cos it’s about carrying personal gear that I won’t need to use everyday but still should to take with me, this isn’t about super important tools and gear neatly layer-out so I know where it is and grab in a snap.
There you have it; the Biker Butt Pack.
I see this as a temporary solution until I know what I want from it, then when I do, I can hopefully buy something that fits the bill or, who knows, I might just keep it, it seems to be working out just fine : )
RELATED LINKS: Find out more tap links below:
[By tapping some of the links below and making a purchase, a small % of that purchase will go toward YOMP NOTES support, at no expense to you. Thank you for your support.]
RELATED LINKS:
RELATED BLOG POST:
YOMP NOTES //AD

Hugely over engineered. Fussy, complicated - so many easier ways to go about this such as buying a hip pack from say Dakine or something. BUT... I LOVE THIS!
ReplyDeleteI have a bunch of hip bags but I just want to make one now!
: )
Delete